Wowzio's Tag Cloud Widget displays the top tags for your blog. Wowzio extracts your tags, technorati tags, as well as auto-extracts tags, then scores them based on recency, frequency and placement.
Benefits
Discovery: Helps bubble up rich content that is deeply embedded in your blog posts.
Interest Driven Navigation: Lets a user navigate down a topic of their interest.
Wowzio's Panoramic SlideShow Widget automatically finds all the pictures on your blog and creates a beautiful slideshow from them for you. Each slideshow image links to its corresponding post.
Benefits
Engagement: Increase articles read per session by providing a new discovery mechanism to your readers.
Distribution: Increase distribution by allowing for easy syndication of your photos. Get visitors from other blogs!
Wowzio's Live Activity Widget shows a real-time list of your blog's latest visitors—where they came from, and what post they are reading. It gives your users an opportunity to explore posts that others are reading, and helps foster a sense of community.
Benefits
Community: To your blog reader, provide a real-time view of who else is on the blog, and what they are reading.
Discovery: Add an interactive discovery mechanism, that naturally piques your user's interest.
You can now add Google Talk to your Google Personalized Homepage. The Google Talk Gadget lets you see your contacts and chat with friends right on your homepage, and it doesn't require a download. You can even add the Google Talk Gadget to your own webpage or blog by pasting a single line of code into your site. You can also add a button to your site so your visitors can pop out the Google Talk Gadget when they visit your page. If you want them to chat with you, just list your username next to the button and ask visitors to sign in and add you as a contact.
For more information about this Google Talk Gadget, please visit Google Talk.
Here is how you can create a simple translate widget for Blogger . This translation widget script uses Google language translation tools. Google Translation Tools enables viewers to get translation with a single click and make your webpage instantly available in other languages. The languages available are for translation are:-
There are large number of blogger post widgets but among them only few are popular , Just like recent post widgets , this widget is one of the most popular and widley used widget used by more then 80% of bloggers in there blogspot webpages .
With the help of feed and Java bloggers have created this widget that display all recent post publish recently in yours blog post ,You only need to enter java code in yours blogger or wordpress layout ,which you can do either manually or directly.
Recet Post Widget
To create Recent Post widget, Log In to yours Feedburner account , and then change the red coloured text to your blog name and burn that URL in Feedburner.
To create Recent Post widget Log In to yours Feedburner account , Open yours FeedGo to Publicize-> Click BuzzBoost ( left side ) -> From there you can create yours recent post widgetaccording to yours preference ,this widget works on feed ,and it works only when yours feed are enabled .
Recent Comments Widget
To create Recent Comments widget, Log In to yours Feedburner account , and then change the red coloured text to your blog name and burn that URL in Feedburner.
Then, open yours FeedGo to Publicize-> Click BuzzBoost ( left side ) -> From there you can create yours recent comments widgetaccording to yours preference ,this widget works on feed ,and it works only when yours feed are enabled .
MyBlogLog is a social network for the blogger community that is based in part on interactions facilitated by a popular web widget that many members install on their blog.You can discover who's visiting your site, and connect with your readers by using MyBlogLog. MyBlogLog is now using Yahoo! Id's. Bloggers can then display widgets on their sites which show MyBlogLog online community members who have recently visited their page. These widgets also contain links to visiting members' community pages, and are one way in which users connect with one another. All members can see certain basic information about how many people visit their blog, what links they clicked and where they come from.
You also can choose buttons to be placed in your site. These buttons will link back to your community on MyBlogLog.
Kontactr is a one-click free contact form service. With Kontactr, you can fight against the amount of spam that you receive daily. Protect your email address by using our highly secure contact form.
Kontactr offers a simple and secure way to share your email with others. It gives you one-click contact form that people can use to contact you without knowing your email address. You can either direct people to this form via ‘contact me’ link OR just embed it on your blog (or any social profile page).
I'm one of the user of this Kontactr. They provide bloggers some useful features:-
If you run a website, blog or a social network, this is a tool you need. This widget will display the number of people currently browsing your website. This is not a page counter, think of it as a 'people' counter. Clicking on the widget brings you to a detailed real time stats pages, which shows a list of pages people are currently reading. Beside each page the number of people on that page. Popular pages are near the top of the list. A list of recent readers and the pages they were or are on is also available.
Want to get started now? Simply visit whos.amung.us and select a widget to add to your site. Have fun!
The outbrain widget is a simple yet powerful ratings & recommendations tool that blends seamlessly into any blog design, inheriting your own look and feel. The widget includes an interactive 5-star rater, and personalized recommended links from your blog as well as others.
5-star ratings - User ratings are one of the best ways to get instant feedback from your readers. A simple click of the mouse and Voila! - their opinion is counted. The widget also displays the average rating and number of users who rated the post. Personalized scores- The widget works with a personalization algorithm, which tries to compute a unique Personalized Relevancy Score for each reader, and for every item that is viewed. If the widget has enough data, the reader will see a message indicating how relevant this post may be. The algorithm is mostly based on a reader's rating history so... the more ratings that are cast, the more content can be personalized for each reader.
Multi-lingual- The widget is available in a growing number of languages (24 at the last count) and dialects, thanks to bloggers who contributed translations. Super easy installation and wide support for platforms - Installation takes minimal effort and does not require any registration. A few clicks and you are done. The widget supports TypePad, Blogger, Wordpress (installed), Drupal, and custom Javascript for your site. Soon to come: Moveable Type and Tumblr.
Widget features - Blends into your blog design - It's your blog, and your content ratings, and there is no reason for it to look any different. All outbrain blog widgets inherit the hosting site's styling properties. Here are two examples:
Ever want to know things like who’s visited your web site, where they came from, and what they’re reading? Well, now you can with this cool free blog widget by FEEDJIT. They provide a simple page where you select one of four widgets which are: live traffic feed, live traffic map, live recommended reading, or live page popularity.
Here are my two favorites which will fit nicely in your blog’s sidebar.
It couldn’t be any easier for Blogger users to install. Just click on the “Add It” link and a Blogger icon will appear. Click on that and it will take you to your Blogger site asking to install the widget. Same goes for Typepad users. WordPress or other web site owners will need to copy the small bit of javascript and paste it somewhere on your site.
Having this widget on your blog makes it fun to look at your site each day and see who’s recently stopped by. Knowing that people from all over the world actually read some of your content is pretty rewarding. Also knowing what sites they came from provides some good data especially if you don’t have any blog analytics like Google Analytics running on your site.
I have posted about many many Twitter Active Badge Generators before. but not many Twitter “Follow Me” Badge Generators. so Twitter Buttons just fits the bill perfectly to fill out that void. it is actually wrong of me to call it a Generator since the only thing it “generates” is the html code for the Badges one you enter your Twitter Username into the page.
Once you have set your username you are ready to go. you have the copy and paste code for whatever badge you choose from at the moment 50 different ones. they have several styles just like the ones i put here as example:
So check them out and see if anyone of those catches your fancy.
Numbered page Navigation widget is very beautiful widget used by bloggers. As you know i have posted this widget before in my blog post.But the css layout of widget works different for some blogs and for some it don't. so i am posting another layout so as if first one doesn't work for some blogs this may work. If you haven't tried first layout try this page navigation widget first then try this one.
How to add this Page Navigation Menu Widget:
Login To Your Blogger And Then Click On Settings And Navigate To Layout Section.
Then Click On Add Page Element.
A new Window Will Open in Which Select Add Html/Javascript. It will ask For Javascript.
Now Click on the link below to download the code. Then, Open it using notepad and copy the contents. Paste the code into the widget box.
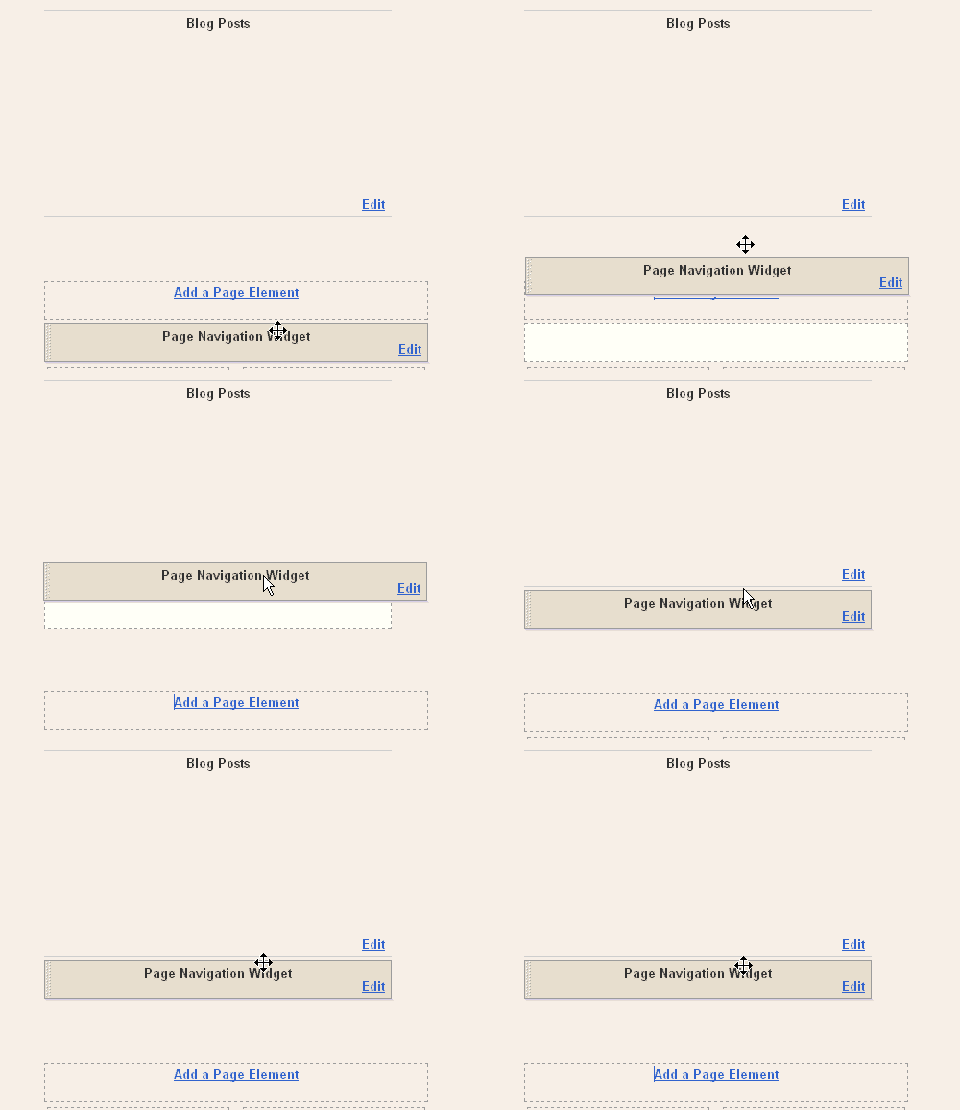
After Adding this Javascript you need to drag and drop the widget below the Blog Posts main widget. See this screen shot
In the above code you can find the below written word and can change its value from 5 to any you want.
1 : var pageCount = 5;
*where 5 is the the number of post that apppear in another page you will visit.
Google Friend Connect Social Media Launch-Working-Tutorial-Install:-New Social media google friend connect has been Launched by google and i would like to share about it with you on its working tutorial and how to install it in blogs especially as some may find it dificulty in doing so.
What is Google friend Connect:-Google Friend Connect means more people engaging more deeply with your website -- and with each other and grow traffic by adding social features to your site.Any website owner can add a snippet of code to his or her site and get social features up and running immediately without programming — picking and choosing from built-in functionality like user registration, invitations, members gallery, message posting, and reviews, as well as third-party applications built by the OpenSocial developer community. Visitors to any site using Google Friend Connect will be able to see, invite, and interact with new friends, or, using secure authorization APIs, with existing friends from social sites on the web, including Facebook, Google Talk, hi5, orkut, Plaxo, and more.
What Google says on new launch ? If you run a website and would like to add social features, you can now sign up for the wait list and learn more by visiting www.google.com/friendconnect. We're going to keep things pretty limited at first so we can gather feedback from site owners, developers, and users, but, in the weeks ahead, we'll be reaching out to more site owners and adding more social apps to the gallery.
How to install google friend connect in Wordpress Blog or website
2. Next You can easily find Set up a new site in their page click it.
You will redirected to below page click on continue link
3. Enter the site name and url and you will be directed to upload "rpc_relay" and "canvas" HTML files to your server.As in blogspot we can't upload it, so i will help you in doing in blogspot.
4. Download both the files.
5.Now open rpc_relay.html in notepad and copy its contents and start a new post in blogspot.
Now keep the title of post as rpc_relay and paste the contents you copied from rpc_relay notepad file in blog post and publish it.
6.Now again start new post and do the same for canvas.html file in by opening it in notepad copy its contents and paste them into new post with post title canvas and publish it.
*Errors*- While publishing the posts with title rpc-relay and cnvas you might encounter an error saying that you cant use the HTML tag, you have to check on stop executing tags and continue to publish it.
*Note*-Publish the two posts on old dates so that posts may not appear in your recent blog posts. Do it from post options i.e at the left of place where you write labels for your post in post editor.
7.Now after publishing continue to other page in google friend connect.
8. you will asked for test to finalize set up jus click it and contnue if you have published both posts succesfully.
9. Now add a members gadget to your site just go and customize your widget and generate html codes of it and paste it in your site.
There are many gadgets you can use in your site that falls in categories of members gadget and social gadget in sidebar of google frind connect page.
You can select any gadget you like customize and generate codes and paste it in your website.
After getting installed the google friend connect members widget check the below widget to make clear how this widget works on your site.
How Installed gadget on your blog or website works Video
You can check the Working of google friend connect by joining it placed in my blog sidebar.
Here is a simple snow effect widget which you can add to your Blogger powered blog in just one click! This widget does not use images to generate the snow effect: instead it uses plain white text (full stops and apostrophes) to act as snowflakes which trickle down the page. You can see this widget in effect here on Blogger Buster over the holiday period.
Click the button below to add this widget to your Blogger powered blog:
This widget has been tested in both IE and Firefox and also in complex Blogger templates which use many other JavaScripts. Unlike other snow effect scripts, this simple non-image based widget works just fine!
I hope you enjoy using this festive decorative widget in your Blogger blogs! Please let me know your opinions or if you experience any trouble installing this widget by leaving your comments below.
Using this tool means you can customize your recent posts widget to your personal preferences and then automatically insert the widget into your Blogger blog!
Simply choose your preferences in the boxes below, click "Apply" and then "Add Widget to my Blog" when you are ready. I've tested this in both IE and Firefox and the widgets seem to appear fine.
Please get in touch if you experience any problems using this widget generator. I hope this helps you all customize the widget to your personal preferences!
 I'm Raj, College student, Blogger, Tech crazy. I live in Kuala Lumpur, Malaysia.


 TypePad,
  Blogger,
  Wordpress (installed), Drupal, and custom Javascript for your site. Soon to come:
  Moveable Type and
  Tumblr.