About Me

Feeds RSS Contact Me

Twitter Updates

SubscribeLatest posts

SubscribeRecent Comments

Advertisements

Increase Your Backlinks
Showing posts with label Free Templates. Show all posts
Sunday, February 1, 2009

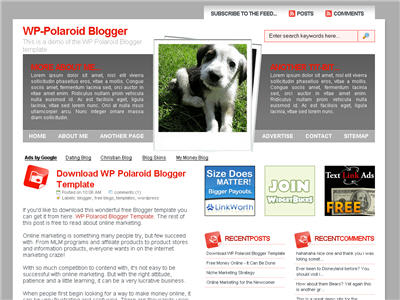
WP-Polaroid Blogger Template- Best of The Year 2008

0 comments


This template is very popular with WordPress users and for good reason. It’s stylish, nicely laid out, and very web 2.0. Not only that, it’s also got the following sidebar page elements built in. You just need to configure them (follow the directions below) in order for them to work properly.


  • Flickr photo slideshow area where you can display your personal or random pictures
  • Mybloglog recent blog readers section (you’ll need a mybloglog account)
  • Three 125×125 ad spots to help you make money from your blog
  • Recent posts list
  • Recent comments list
  • Two sidebar link lists
  • Page navigation links in the header
  • RSS feeds for your posts and comments
  • A header spot to display your personal photo


Make sure to read through all the steps below in order for the template to function on your blog properly. I tried to make it as simple for you as possible by using the Page Elements instead of embedded code but if you have any questions, please post them below. I usually get back to everyone within 24 hours so please be patient!

Also, please be aware that in order to correctly setup this template you’ll need to be comfortable with editing the template code as well as some experience with photo editing software (see step #9). I’d hate for you to spend a bunch of time trying to get this template working only to hit a road block towards the end.


WP-Polaroid Blogger Installation

Now I’m going to be honest with you before we begin. When you use this template you’ll most likely have to wipe out all your existing page elements and start from scratch. Not only is this easiest but it also gives you a clean slate. Now this isn’t always the case but I just wanted to warn you upfront. You might even want to setup a new blog within Blogger to test this template out before you really start using it. It’s easy to do — just go to your Blogger dashboard (top right corner link) and “create new blog”. Think of it as a testing area before clobbering your existing blog. Another option is to try and backup your existing page elements which is explained in my “How to Install a Blogger XML Template” article.

Disclaimer: I am not responsible if you mess up your Blogger site. This template and set of instructions is free but does not come with any sort of warranty. I’m sure you already realize this but I just wanted to cover my butt regardless. (this is the fine print)

The following 10 steps assume you’ve installed the new WP-Polaroid Blogger template and are now ready to configure the page elements. If you had trouble installing the template, try applying it a second time and saving. Blogger is buggy and that’s actually what I had to do when setting up a demo blog for this writeup (Update - you might want to start with step #10 and then come back to step #1 since it involves editing the actual template code before setting up the page elements).

You can also download the original Photoshop .psd from Adii’s site if you’d like to modify the images. He also provides some steps on setting up the template but for WordPress only.

Open your blog site in a new browser window so you can see how it currently looks. I’ve put some placeholder text in some areas (which we’ll replace in the steps below) to give you an idea as to how it’s supposed to look. Now in a separate browser window, head on over to “Template” =>”Page Elements” and we’ll start setting up your new Blogger template.

Step #1 - Configure the Header Page Elements


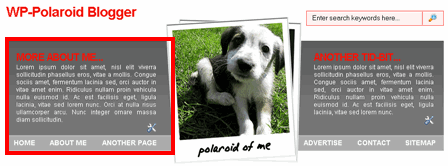
First we’re going to customize the header and we’ll start with the Header-Text-Box-Left page element which you can see marked with a red square in the image.

header-text-box-left.gif


Now when you edit the page element you’ll see “Header-Text-Box-Left” as the title which you can change to something like “MORE ABOUT ME…”. Then add whatever text you want in the text box which will end up appearing below the title (like the white text in the image). Ok, save your page element and you’re done with this box. Do the same with the “Header-Text-Box-Right” page element and you’ll be finished with the header text boxes. Save and then refresh your other Blogger browser window to see what it looks like. We’ll take care of the header links and center puppy image later on since it requires editing of the template code. Let’s move on.


Step #2 - Setup Recent Posts and Recent Comments Page Elements


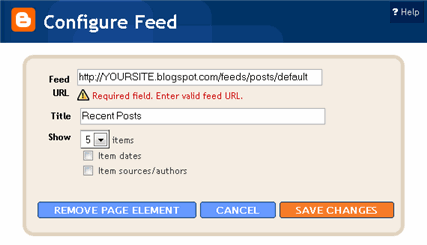
These lists aren’t going to show up when you first installed the template so we’re going to bring them to life now. They are actually both RSS Feed widgets so we’ll need to paste in your feed and comment rss feeds to make them work. Let’s start with the Recent Posts page element so click edit it. Then paste in your RSS feed url which will most likely be in this format http://YOURSITE.blogspot.com/feeds/posts/default . Make sure to replace “YOURSITE” with your actual blog url.


recent-posts-feed.gif


There’s no need to change the title (unless you want to call it something else) so then hit “Save Changes”. Then save your blogger layout and go over to your other browser window, refresh and see the Recent Posts appear in your blog’s sidebar. Pretty cool huh! Now you’re going to do the exact same thing with the “Recent Comments” page element but you’ll instead use this feed format http://YOURSITE.blogspot.com/feeds/comments/default . Again, make sure to replace “YOURSITE” with your actual blog url. Save and make sure it’s working properly. If it doesn’t appear on your blog, chances are you don’t have the correct feed url or you might not have any comments yet.


Step #3 - Setup My Sponsors and Link Love Page Elements


These two page elements are basically link lists where you can links to any sites. Did you know that you can actually sell links from your blog? It’s a very popular and growing business on the web since the number and quality of links to ones’ site increases their rankings in Google and Yahoo. If you want to learn more about selling links on your blog, check out Text Link Ads for more information. I use them and they do a 50/50 revenue split which is great since they handle the advertising & transactions.


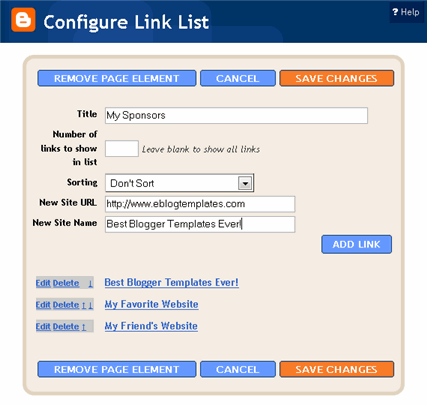
Anyhow, to setup the link page elements, click on edit of the My Sponsors page element and then enter the names and urls of the sites you wish to link to. Feel free to add a link to my site so other’s know where you got this wonderful template!

my-sponsors.gif


Now do the same for the Link Love page element to get additional links added. If having both link page elements is too much, feel free to delete one from your page layout.


Step #4 - Configure the Blog Archive Page Element


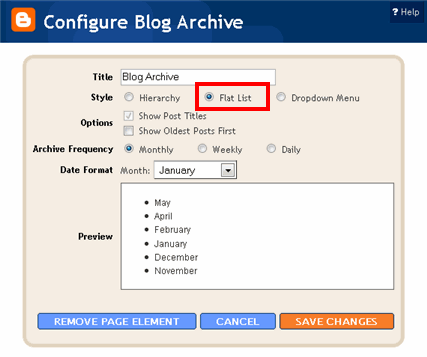
This page element should have been working from the moment you installed this template. The only problem is it probably didn’t look right because the page element style needed to be set to “Flat List” so let’s do that now (if your blog archive list is already set to flat, then you can skip this step). Edit the page element and change the default of “Hierarchy” to “Flat List”. You’ll see it change in the preview window so you’ll know it worked.

blog-archive.gif


Click “Save Changes” and then save the page layout. Now view your blog which you have open in a separate browser window to see how it looks now. It should be correct.


Step #5 - Configure the Recent Readers Page Element


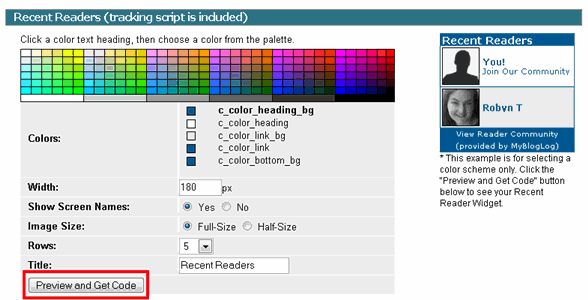
Now this is one of the unique and cool features about this template. It’s integrated with MyBlogLog which is a cool tool for showing pictures of visitors to your site. If you don’t already have an account, you need to set one up first before completing this step. Once you’ve setup an account, claimed your blog, then you can create a widget. I’m going to assume you’ve done those steps and are now ready to plug in your widget. You should be on this screen now within mybloglog.com.

mybloglog.gif


We’re going to make this very easy so don’t worry about any of the colors, width, etc and just click the “Preview and Get Code” button. I know this sounds strange but just stick with me here. So the next screen you’ll get a page with the blocks of code you can use. It will look like this:


mybloglog-code.gif


The only piece of that code that we need is the part I’ve marked in red. This is the mblID code which is the unique id just for your blog. you’re going to copy this entire id code (I covered some of the digits in the screenshot on purpose) which should be 16 numbers, and put it somewhere safe (like open notepad and paste it there for now).


<script type="text/javascript" src="http://pub.mybloglog.com/comm2.php?mblID=PUTYOURCODEHERE&c_width=425&c_sn_opt=n&c_rows=2&c_img_size=f&c_heading_text=Recent+Readers&c_color_heading_bg=FFFFFF&c_color_heading=ffffff&c_color_link_bg=FFFFFF&c_color_link=FFFFFF&c_color_bottom_bg=FFFFFF"></script>


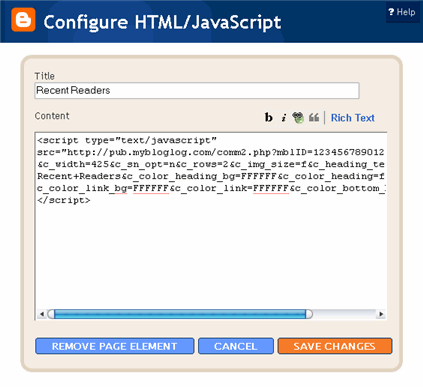
Then take this javascript code above and replace the “PUTYOURCODEHERE” with the 16 digit number you just put somewhere safe. Next, you’re going to edit the “Recent Readers” page element and paste this new code into the text box. It will look like the image below but it won’t wrap (I just did it for illustration purposes).


recent-readers-js.gif


Click “Save Changes” and go preview it in your blog. This will replace the current set of mybloglog pictures you see on your site with your set of visitors. Now don’t get too excited because there’s a good chance this section will be empty for a while (almost for sure if you just signed up for a mybloglog account) since you haven’t had any visitors yet so don’t worry. Give it a few weeks before you’ll see some pictures appear.


Step #6 - Configure the Flickr Photo Page Element


This is another optional page element and you can go ahead and delete it if you want. The configuration requires you have a Flickr account and some experience picking out pictures to link to. The pictures that are already installed on this Blogger template are basically links directly into Flickr. There are more than one way to get this section working (like using rss instead of hard coded image links) but I’m only going to show you the simple way. First edit the “FlickrRSS” page element and make sure you’re in html edit mode. Then in the text box you’ll want to paste in the new image code you want to use (see below for the proper format). It will look something like this:


flickr.gif


Here’s the code I’m currently using to make the images work:


<p><a href='http://www.flickr.com/photos/alankin/2213697421/'><img src='http://farm3.static.flickr.com/2312/2213697421_6be21edcfa_s.jpg' alt='different paths' /></a></p><p><a href='http://www.flickr.com/photos/alankin/2213697413/'><img src='http://farm3.static.flickr.com/2399/2213697413_c30648a36a_s.jpg' alt='college campus lawn' /></a></p><p><a href='http://www.flickr.com/photos/alankin/2213697411/'><img src='http://farm3.static.flickr.com/2150/2213697411_96525d4022_s.jpg' alt='wires in front of sky' /></a></p><p><a href='http://www.flickr.com/photos/alankin/2213632473/'><img src='http://farm3.static.flickr.com/2215/2213632473_8cf8af1c7f_s.jpg' alt='aerial perspective' /></a></p><p><a href='http://www.flickr.com/photos/alankin/2213632465/'><img src='http://farm3.static.flickr.com/2043/2213632465_5ce3aa4813_s.jpg' alt='clouds' /></a></p><p><a href='http://www.flickr.com/photos/alankin/2213632461/'><img src='http://farm3.static.flickr.com/2392/2213632461_96a8be9c06_s.jpg' alt='clouds over the highway' /></a></p><p><a href='http://www.flickr.com/photos/alankin/2214395424/'><img src='http://farm3.static.flickr.com/2253/2214395424_b9f11a18c0_s.jpg' alt='The Poultney Inn' /></a></p><p><a href='http://www.flickr.com/photos/alankin/2214395422/'><img src='http://farm3.static.flickr.com/2133/2214395422_1aa98af39f_s.jpg' alt='apartment for rent' /></a></p>


So essentially you need to find pictures on Flickr or somewhere on the web that you want to link to. Using Flickr’s small image size makes sure that they will properly fit in this page element area. Make sure you use the code format above (<p> and </p> around each image) and use eight images. If not, it won’t look right on your blog. Again, the code snipet above is the exact code I’m using for the default images on your blog.


Hopefully this step makes sense and you’re able to add the images you want. If not, just remove the page element and move on.


Step #8 - Configure the Three 125×125 Ad Spots


I don’t know about most of you but I like to try and monetize my blogs. It’s a great passive income stream and fun to see how much you can make. Don’t expect a lot to pour in but at least get some ads on your site to make a few bucks. If you haven’t already read my “How to Make Money From Your Blog - Tip #1” article about setting up Google AdSense on your blog, I’d advice you to read it. You can create 125×125 ads within Google and place them in these spots, for example.


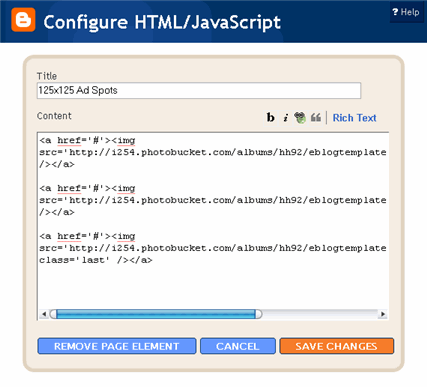
Now let’s go edit the page element. You need to have three 125×125 ads ready to pop into this spot otherwise it’s not going to work. The images also need to be hosted somewhere so make sure you’ve got everything ready before moving forward. Here’s an example of what your code will look like:


125×125-ad-spots.gif


This is the actual code currently being used in your blog template. It’s placeholder code but important to keep so continue reading to understand why.


<a href="http://www.linkworth.com/?a=10230"><img src="http://i254.photobucket.com/albums/hh92/eblogtemplates/adstheme/banner-linkworth2.gif" border="0px" /></a>

<a href="http://www.widgetbucks.com/home.page?referrer=10252004"><img src="http://images.widgetbucks.com/images/referral/125x125_A.gif" border="0px" /></a>

<a href="http://www.text-link-ads.com/?ref=2164"><img src="http://i254.photobucket.com/albums/hh92/eblogtemplates/ads/text_link_ads_F_125x125.gif" border="0px" class='last' /></a>


It’s very important you keep the formatting of this section intact otherwise they won’t appear properly. I’m mainly speaking about the class='last' tag at the end of the third 125×125 ad. If that isn’t included in your code, it will look funny on your site. This is a hard step so hopefully you got this far.


If you don’t have any ads to use yet, feel free to keep the placeholder ads there. I recommend clicking on the three ads and setting up accounts with them so you can make money with your blog. If you don’t want the ads you can just delete this page element from your page layout.


Step #9 - Change the Puppy Header Image


Yes, you’re probably wondering why there’s a picture of a cute puppy on your blog. The good news is I actually put it there as a placeholder so it’s easier for you swap out and add your own image. The bad news is you’ll need to have some photo editing skills in order to get the image setup correctly. So first let me tell you how to change the image and then second, explain how to add your own instead. The puppy image code is in the .css part which looks like this:


/*=== Change this header puppy picture to one of yours ===*/

#polaroids-pic{

background: url(http://i254.photobucket.com/albums/hh92/eblogtemplates/polaroid/puppy.png) no-repeat;


This is where you’ll need to put the link to your new image. If you don’t want an image at all (or at least for the time being) then just delete the url and the default black polaroid picture will appear. The puppy picture is just positioned on top of the default black picture.
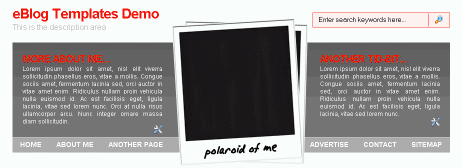


header-pic-no-puppy.gif


So before you can add a new photo, you’ll need to properly size and rotate it. So open your picture in any photo editor like MS Paint, Adobe Photoshop, Paint.net (free download), GIMP (free download), or Picasa. If you don’t have software already installed, you can always use one of the free online photo editing sites instead like Picnik, Phixr, or FotoFlexer. Whichever photo editing software you decide to use, get ready to make the following two changes.


  • Resize the photo to 240×240

  • Rotate the photo 4 degrees counter clockwise


Update (2/1/08)


Due to popular demand, I’ve made the polaroid header image straight so it’s easy to add your personal photo without having to rotate it. It’s included in the latest version so just download and you’ve got it.


This sets up the photo to the right size to fit back on top of the polaroid background. Next, save the image you just modified (You can save the photo in any of the standard image formats like png, gif, jpeg, etc) and upload it to a place online where you can link to it.


There are free image hosting services like Photobucket, Googlepages, or ImageShack just to name a few. I personally use Photobucket but any of those will do. You’ll need to setup a free account and then you can upload your images. After you’ve uploaded your new image, you need to get the url where the image is now located. If you decided to use Photobucket, your new url will look something like this:


http://i254.photobucket.com/albums/hh92/yourname/newfolder/yourpicture.png


Take that url and replace the puppy.png url I showed you above. Save your template and reload your blog. Your new picture should now be on your home page! If not, then double-check and make sure you correctly uploaded the photo and it works. If you see your photo on your home page but it’s just not aligned properly, then you’ll need to go back to your photo editing program and tweak it some more. Another option is to edit the .css file and search for #polaroids-pic { . There you can the position, height, width, etc for fine tuning. You really shouldn’t need to mess with those settings though.


UPDATE: If you also want to remove the “Polaroid of Me” text across the default polaroid picture you can. You’ll need to edit the template code and replace the existing polaroid image on line 219 with this one. Search for “rotator.png” then replace it with “blank-polaroid.png” and you should be good to go. (Thanks to Lindsay in the comments below for the suggestion!). The latest download version now comes without the text on the polaroid picture.


Step #10 - Change the Navigation Header Links


This probably should have been step #1 but I honestly forgot about them until now. These links are hard coded into the template so you need to edit the actual code to make them work. Just edit the code template and search for the following bits of code:


<li><a href='/'>HOME</a></li>

<li><a href='#'>ABOUT ME</a></li>

<li><a href='#'>ANOTHER PAGE</a></li


You should keep the HOME link as is since it just points back to your home page. You’ll also want to change the links on the right side as well:


<li><a href='#'>ADVERTISE</a></li>

<li><a href='#'>CONTACT</a></li>

<li><a href='#'>SITEMAP</a></li>


Now just change the a href=”#” and tab name to something you want for each of the links. Do it for both sides and that’s it. Pretty easy actually. Just make sure to save it and say yes when it asks you to delete several page elements like HTML1, HTML2, etc. I don’t know why it asks you each time when you save your template. I think it’s a Blogger bug actually.


Well folks, after 2 hours of writing this up and 8+ hours of converting this template to Blogger, I’m officially done! I hope you enjoy the template and the instructions on configuring it. If it wasn’t for Adii (the original designer), this template never would have been available to convert into a Blogger template!


If you have any questions please post below using the comments box. Please be aware I am not a photo editing expert and questions should only relate to configuring this template. Blogger in general, has lots of bugs so any “bx-” type error messages you may get I won’t be able to help you. Sorry but it’s Blogger’s fault not mine or yours.


Revision History


Update (2/25/08) - A bug has been found and fixed as of today. It’s a small one but it was brought to my attention by Tessa and Rey. The “Next” and “Previous” posts links were missing from the bottom of the template. If you downloaded this template prior to today, you’ll either have to download it again or fix your existing template. The fix is pretty easy and as follows:


Search your template code for the tag <data:adEnd/>. There should actually be two of them. You want the second one. Below that code you want to paste:


<!-- navigation -->

<b:include name='nextprev'/>


<!-- feed links -->

<b:include name='feedLinks'/>


The final block of code should look like this:
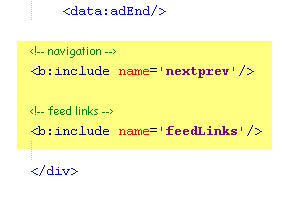

add-new-code-polaroid.jpg


You’ll then want to style this new set of links which is also easy to do. Scroll back up to the top of your code and in the .css section you’ll want to add the following code:


#blog-pager-newer-link {float: left;}

#blog-pager-older-link {float: right;}


#blog-pager {padding:50px 15px 0px; text-align: center; }


This will make your new links aligned neatly instead of being squished to the left. You can style them even further (color, size, etc) but you’ll have to do that on your own.


Update 4/22/08 - Several people requested to have real 125 x 125 ads instead of the blank placeholder ones so this has been done. A new screen shot shows how this looks as well as the live demo. You can swap out the ads or keep them there indefinitely if you don’t have any ads to use.


Update 5/17/08 - Fixed the individual post image right align issue. You can easily fix this yourself if you’re using this template prior to 5/17. Search your template code for “.postmetadata” and then change the padding element of “15px” to “20px”. That will push everything down and align the images correctly.


Friday, January 30, 2009

Blogger Template: Joy

0 comments


This free Blogger template can be either a 3- or 6-column template. If you want a 3-column template, simply don't fill in the lowerbar widgets and make its colors blend with the post column.

The right sidebar is 336 pixels wide, great for the placement of a large Adsense square box, or if you want to put large pictures like in the test blog above.

Features
  • The "Read more..." function is available to shorten posts.
  • Almost all colors and fonts are easy to customize.
  • Blog Posts Edit buttons are fully functional.
  • Flexible number of sidebars.
  • Menubar below the header for easy navigation.
  • Header image can be easily changed.
  • Tested ok in all browsers using Browsershots.org.


Header Image
To put the header image in your blog, left-click on the image below and save the actual size into your computer. Then, upload the image using the Layout > Page Elements > Header Edit tab. If you want to use your own image for the header, the image width has to be 930 pixels (with any height).


Blogger Template: Shiny

0 comments


This free Blogger template can be either a 3- or 6-column template. If you want a 3-column template, simply don't fill in the lowerbar widgets and make its colors blend with the post column.

The right sidebar is 300 pixels wide, great for the placement of a large Adsense square box, or if you want to put large pictures like in the test blog above.

Features
  • The "Read more..." function is available to shorten posts.
  • Almost all colors and fonts are easy to customize.
  • Blog Posts Edit buttons are fully functional.
  • Flexible number of sidebars.
  • Menubar below the header for easy navigation.
  • Header image can be easily changed.
  • Tested ok in all browsers using Browsershots.org.

Header Image
To put the header image in your blog, left-click on the image below and save the actual size into your computer. Then, upload the image using the Layout > Page Elements > Header Edit tab. If you want to use your own image for the header, the image width has to be 980 pixels (with any height).


Blogger Template: Sunset

0 comments


This free Blogger template can be either a 3- or 6-column template. If you want a 3-column template, simply don't fill in the lowerbar widgets and make its colors blend with the post column.
Features
  • The "Read more..." function is available to shorten posts.
  • Almost all colors and fonts are easy to customize.
  • Blog Posts Edit buttons are fully functional.
  • Flexible number of sidebars.
  • Menubar below the header for easy navigation.
  • Header image can be easily changed.
  • Tested ok in all browsers using Browsershots.org.

Header Image
To put the header image in your blog, left-click on the image below and save the actual size into your computer. Then, upload the image using the Layout > Page Elements > Header Edit tab. If you want to use your own image for the header, the image width has to be 950 pixels (with any height).


Sunday, January 25, 2009

Blogger Template: Cumulus

0 comments


Features
  • The "Read more..." function is available to shorten posts.
  • Almost all colors and fonts are easy to customize.
  • Blog Posts Edit buttons are fully functional.
  • Flexible number of sidebars.
  • Menubar below the header for easy navigation.
  • Header image can be easily changed.
  • Tested ok in all browsers using Browsershots.org.
Help links: template installation guides and instructions.

Header Image
To put the header image in your blog, left-click on the image below and save the actual size into your computer. Then, upload the image using the Layout > Page Elements > Header Edit tab. If you want to use your own image for the header, the image width has to be 755 pixels (with any height).

Special Tribute: Ramadhan Al-Mubarak

0 comments


Features
  • The "Read more..." function is available to shorten posts.
  • Almost all colors and fonts are easy to customize.
  • Blog Posts Edit buttons are fully functional.
  • Flexible number of sidebars.
  • Menubar below the header for easy navigation.
  • Header image can be easily changed.
  • Tested ok in all browsers using Browsershots.org.
Help links: template installation guides and instructions.

Header Image
To put the header image in your blog, left-click on the image below and save the actual size into your computer. Then, upload the image using the Layout --> Page Element --> Header Edit tab. If you want to use your own image for the header, the image has to be 800 pixels wide (with any height).

Header image credit: adapted from ramadanreminders.com

XML Blogger Templates: Newspaper III

0 comments


This free Blogger template webdesign is based on a newspaper theme. It can be either a 3- or 6-column template. If you want a 3-column template, simply don't fill in the lowerbar widgets and blend its colors with the post column.

The sidebars are 200 px wide, perfect for the large square Adsense box. The grey sections below the menubar and above the lowerbar are perfect to place text ads, image ads, or link ads.

Similar templates: Newspaper (right sidebar), Newspaper II (left sidebar).

Features
  • The "Read more..." function is available to shorten posts.
  • Almost all colors and fonts are easy to customize.
  • Blog Posts Edit buttons are fully functional.
  • Flexible number of sidebars.
  • Menubar below the header for easy navigation.
  • Header image can be easily changed.
  • Tested ok in all browsers using Browsershots.org.
Important: Change your template without loosing any sidebar widgets.
Help links: template installation guides and instructions.

Header Image

To put the header image in your blog, click on the image below to open up a larger size and save it into your computer. Then, upload the image using the Layout > Page Elements > Header Edit tab. If you want to use your own image for the header, the image width has to be 990 pixels (with any height).

Header image credit: adapted from David Niblack (credit accordingly if used).

Blogger Templates: Newspaper

0 comments


This free Blogger template webdesign is based on a newspaper theme. It can be either a 2- or 5-column template. If you want a 2-column template, simply don't fill in the lowerbar widgets and make its colors blend with the post column.

The right sidebar is 300 px wide, perfect for the large square Adsense box. The grey sections below the menubar and above the lowerbar are perfect to place text ads, image ads, or link ads.

Similar templates: Newspaper II (left sidebar), Newspaper III (2 sidebars). These 3 templates were influenced by the original Woork template design.

Features
  • The "Read more..." function is available to shorten posts.
  • Almost all colors and fonts are easy to customize.
  • Blog Posts Edit buttons are fully functional.
  • Flexible number of sidebars.
  • Menubar below the header for easy navigation.
  • Header image can be easily changed.
  • Tested ok in all browsers using Browsershots.org.

Header Image
If you want to use your own image for the header, the image width has to be 950 pixels (with any height). Then, upload the image using the Layout > Page Elements > Header Edit tab.

Blogger Template: Spain

0 comments


Features
  • The "Read more..." function is available to shorten posts.
  • Almost all colors and fonts are easy to customize.
  • Blog Posts Edit buttons are fully functional.
  • Flexible number of sidebars.
  • Menubar below the header for easy navigation.
  • Header image can be easily changed.
  • Tested ok in all browsers using Browsershots.org.
Header Image
To put the header image in your blog, left-click on the image below and save the actual size into your computer. Then, upload the image using the Layout --> Page Element --> Header Edit tab. If you want to use your own image for the header, the image has to be 900 pixels wide (with any height).

Header image credit: adapted from Template Panic.


Saturday, January 24, 2009

Blogger Template: Sunshine

0 comments

This is a flexible 3 or 6 columns template, with additional 3 columns below the post section. 99% of the colors and fonts can be easily changed from the Layout Section.


Header Image
The header image doesn't come with the template file. To put the header image in your blog, left-click on the image below and save the actual size into your computer. Then, upload the image into the Header Page Element in the Layout section of your blog.

Header image credit: adapted from skeedz.com.

If you want to use your own image for the header, the image has to be 800 pixels wide (with any height) to fit the header nicely.

Credits to OurBloggerTemplates

Blogger Template: Columnus

0 comments


Features
  • The "Read more..." function is available to shorten posts.
  • Almost all colors and fonts are easy to customize.
  • Blog Posts Edit buttons are fully functional.
  • Flexible number of sidebars.
  • Menubar below the header for easy navigation.
  • Header image can be easily changed.
  • Tested ok in all browsers using Browsershots.org.
Credits to ourbloggertemplates.

Blogger Templates: The Professional Template

0 comments

The Professional Template is by far the best template we have ever produced for public use. It has multiple columns that are flexible - it can either be a 3, 5, 6, or 8 column template without you having to do any coding. The basic color is white, but you can easily change all the colors and fonts without doing any coding. And you can change the header image to anything you want without any coding too.


This free Blogger template webdesign is based on a professional template theme. It can be either a 3, 5, 6, or 8 column template. If you want a 3 or 5 column template, simply don't fill in the smaller sidebars on the right and the lowerbar widgets; then make its colors blend with the post column.

The left sidebar is 120 px wide, and the main right sidebar is 300 px wide, perfect for vertical and square Adsense boxes. The two smaller rightsidebars are 132 px wide. All the 3 lowerbar columns are 278 px wide.

Features
  • The "Read more..." function is available to shorten posts.
  • Almost all colors and fonts are easy to customize.
  • Blog Posts Edit buttons are fully functional.
  • Flexible number of sidebars.
  • Menubar below the header for easy navigation.
  • Header image can be easily changed.
  • Tested ok in all browsers using Browsershots.org.

Header Image

To put the header image in your blog, click on the image below to open up a larger size and save it into your computer. Then, upload the image using the Layout > Page Elements > Header Edit tab. If you want to use your own image for the header, the image width has to be 970 pixels (with any height).

Header image adapted from helmet13 (credit accordingly if use).

Credit to Ourblogtemplates.

Friday, January 9, 2009

The Best 90 Free Blogger Templates

0 comments

While these Blogger templates didn't make it to my personal top ten, the following are excellent Blogger templates! So in no particular order of preference, I present a further 91 stylish and well designed Blogger templates which are all free to use and download:


Andreas 02

Andreas02

Features tabbed navigation and an excellent header section. By Gecko and Fly


Demo | Download


Rotterdam

Rotterdam

By Pannasmontata


Demo | Download


Glossy Blue

Glossy Blue


Hi tech, glossy magazine style with mini icons in the sidebar


Demo | Download


Wow (Smashing)

Wow (Smashing)

The Jackbook conversion of an excellent (OMG! style) template, with all features intact


Demo | Download


Semipro

Semipro


With tabbed navigation and a web 2.0 feel. Designed by Dzelque


Demo | Download


Semipro II

Semipro II

A dark version of Semipro, by Dzelque


Demo | Download


Sky3c

Sky3c


Unique icons and title styling. Modified for Blogger by Blog Crowds


Demo | Download


02

02


A slick Web 2.0 style template featuring all the right styles, designed by Blog And Web


Demo | Download


Neo

Neo

A lightning fast, Ajax powered Blogger template which was designed to be customized with your own styling. Designed by Hackosphere


Demo | Download


Enlighten

Enlighten

A beautiful glossy blue and black theme with a feminine touch. Designed by Zona Cerebral


Demo | Download


Gluttony

Gluttony

Monochrome and very professional. By Zona Cerebral.


Demo | Download


Premium Brown

Premium Brown

Yet another delicious template from Zona Cerebral. Features 125px square ad spaces in the sidebar, plus excellent use of icons throughout the template.


Demo | Download


Decorativo

Decorativo

I like the stylish curled corner in the top of the sidebar! Overall, a professional and well designed conversion by Blog and Web.


Demo | Download


Butterfly

Butterfly

Here's one of my own designs: the Butterfly template which features animated butterfly in the sidebar. This is probably the most downloaded template I have produced so far, and it's usable "right out of the box".


Demo | Download


DF Theme (3 Column)

DF Theme

Based on the classic Deziner Folio theme, Jackbook has converted this to a three column version for Blogger.


Demo | Download


Gossipcity

Gossipcity

Another excellent conversion from Wordpress. By Blog And Web


Demo | Download


Resurrection

Resurrection

Dark and imaginative, with function for your Twitter feed and a great RSS/Feed icon. By Zona Cerebral


Demo | Download


Summer Love

Summer Love

A feminine two column theme by Blog Crowds


Demo | Download


Shylapa

Shylapa

Another finalist from the Style Contest modified by Blog Crowds.


Demo | Download


Mistylook

Mistylook

A classic and timeless design. By Blog Crowds.


Demo | Download


Cool Blue

Cool Blue

A pale blue, Web 2.0 style template of my own design. Features unique sidebar design and calendar widgets.


Demo | Download


Red Web 2.0 template

Red web 2.0

A red version of the Web 2,0 style template


Demo | Download


K2

K2

Another classic theme by Gecko and Fly


Demo | Download


Erudite (3 column)

Erudite (3 column)

A three column template for the guys... By Gecko and Fly.


Demo | Download


Flower Pink Border

Flower Pink Border

And a template for the girls, by SuckMyLolly


Demo | Download


Smashing (magazine)

Smashing (magazine)

Based on the Smashing Magazine theme, by Blog And Web.


Demo | Download


Clean Elegant

Clean Elegant

Simple and fresh, by Jackbook


Demo | Download


Drivin to L.A.

Drivin to L.A.

A retro feminine theme by SuckMyLolly


Demo | Download


Underground

Underground

A simple but effective template by B-Themes


Demo | Download


Minyx

Minyx

Another great template from B-themes which was converted from a Wordpress theme created by Mauricio Caballero.


Demo | Download


Quirky Valentine

Quirky Valentine

A candy cute girly theme by Better in Pink


Demo | Download


City Tree

City Tree

Yellow themes seem few and far between, but this one carries it off SO well! By Dan S.


Demo | Download


Terminal Black

Terminal Black

A classy dark three column theme by Charm Skins


Demo | Download


Terra Blue

Terra Blue

Clean and blue with an RSS icon in the sidebar. This template was designed by Charm Skins.


Demo | Download


Tropical Retreat

Tropical Retreat

Doesn't this theme make you want to start a travel blog on a beautiful desert island somewhere..? Theme by Free Blogger Skins.


Read more and download


Beauty Beach

Beauty Beach

Another cute template by Free Blogger Skins


Read more and download


Simplicity

Simplicity

A fresh and feminine theme by Fresh Blogger Templates


Demo | Download


Terra Firma

Terra Firma

A beautifully designed two column template. Converted from Wordpress by Fresh Blogger Templates


Demo | Download


The Missing Piece

The Missing Piece

Originally designed by CSS Templates, this theme has been converted for Blogger by Fresh Blogger Templates


Demo | Download


Beautiful Day

Beautiful Day

A serene, feminine template by Templates for You.


Demo | Download


A day without Chocolate

A Day Without Chocolate

Delicious! A girly theme by Annie of BlogU


Demo | Download


Midnight

Midnight

A widgetized version of the popular Blogger template, by Template Panic.


Demo | Download


Shinobi

Shinobi

A smooth dark Web 2.0 style template by Blogger Buster


Demo | Download


Aquaria

Aquaria

Shiny, Web 2.0 style template with an aquatic theme. By Templates for You.


Demo | Download


She's got style

She’s got Style

This would be a great theme for a fashion blog or budding fashionista. Originally a Wordpress theme by Grab a Theme and Sweet Melancholy, ported to Blogger XML by Templates for You.


Demo | Download


LikeWise

LikeWise

This one's unusual: one wide main column with three columns in the footer. Ideal for Bloggers whose content is of first and foremost importance! By Thurbroeders.


Demo | Download


Snow Below

Snow Below

I just love this template by Annie of BlogU. It's so serene and pretty!


Demo | Download


Bloggin Out Loud

Bloggin Out Loud

A well designed three column template by Gisele Jaquenod.


Read more and download


Birdies Secret Garden

Secret Garden


A cute birdy themed template by Gisele Jaquenod.


Read more and download


Maserati

Maserati

Simple two column theme with masculine elegance. By Final Sense.


Demo | Download


Agua

Agua

This cool minimalist template features header navigation links and a smart sidebar. Adapted for Blogger by Blog and Web.


Demo | Download


Dead

Dead

Dark and gothic, this theme will certainly have a fond following... Created for Blogger by Blog and Web.


Demo | Download


Autumn Grass

Autumn Grass

I love the concept of this template: a wholly interactive header with vertical links navigation, ad spots and even support for videos! Designed by K2 Modify (a variation of this theme is used in this blog)


Read more and download


Classic ProBlogger template

Classic ProBlogger template

If you're a fan of Problogger, you may well regognize this theme. Created for Blogger by K2 Modify


Read more and download


Basic Black YouTube template

Black Basic YouTube template

So you want to feature YouTube videos in your blog header? Then this design by K2 Modify is for you!


Read more and download


Eclipse

Eclipse

A simple dark theme with sidebar icons and header navigation. By Planet of Free Blog Templates


Read more and download


Hobbit

Hobbit

For Hobbit fans, this would make an excellent choice! By Hans of Beautiful Beta.


Read more and download


Flower Girl

Flower Girl

Sweet and feminine without being tacky. By Free Blog Skins.


Read more and download


Bloggerized Adsense

Bloggerized Adsense

Plenty of ad slots in this template, which makes it ideal for those who make money online! By Blogger Beta.


Demo | Download


Buy iPod

Buy iPod

Great navigation in this tech-style template! Created by Jackbook.


Read more and download


Red Glow

Red Glow

Moody and dark, this template somehow reminds me of The Ghosts of Mars... Great template nonetheless! And very stylized. Designed by Jackbook.


Demo | Download


Fluid Solution

Fluid Solution


As the title suggests, this is a fluid template which will stretch to fit the browser window. Clean and simple, you can change the logo to suit your own tastes. Ported to Blogger by Jackbook.


Demo | Download


Mushblue

Mushblue

Another great Wordpress conversion by Jackbook.


Demo | Download


Gemstone

Gemstone

A lightweight blue and black design with many links in the header. Great for gadget/technology blogs. Originally designed by GemStone CSS, of Arcsin, and now ported by Erica Akira of Templates for You.


Demo | Download


Rosa

Rosa

A simple two column blog with a STUNNING header! Designed by Blog and Web.


Demo | Download


Wordpress Admin

Wordpress Admin

Would you like to confuse your visitors into thinking they have stumbled across your Wordpress admin page? If so, take a look at this "Wordpress Admin" themed template. Jackbook even did a great job of confusing me...


Demo | Download


JournalRed

JournalRed

Stylish and classic design by Dzelque.


Demo | Download


Tierra

Tierra

A striking, earthy design by Blog and Web.


Demo | Download


Zen

Zen

Professional and relatively simple. Another great theme by Blog and Web.


Demo | Download


NeonNeon

NeonNeon

Daring and inspirational, this template really hits the mark. by Blog and Web


Demo | Download


Sandpress

Sandpress

Professional and light, converted for Blogger by Zona Cerebral.


Demo | Download


Paper Border

Paper Border


Features a paper effect around the whole blog. Designed by Template Panic.


Demo | Download


Home Sweet Home

Home Sweet Home

Monochrome template with a quirky, homely feel. By Template Panic.


Read more and download


iwork

iwork

Such a slick and usable theme! Converted from the original Wordpress theme by Jackbook.


Demo | Download


Neosapien

Neosapien

Striking and original, by Blog and Web.


Demo | Download


Candy Colored Dreams

Candy Colored Dreams

A retro style theme by SuckMyLolly.


Demo | Download


Magic Paper

Magic Paper

Mystical and artistic. A wonderful Blogger port by Blog Crowds.


Demo | Download


Top Secret

Top Secret

Make your blog appear as a top secret file! Ported to Blogger by Blog Crowds.


Demo | Download


Cat Crazy

Cat Crazy

Perhaps it's the cat lover in me... A cute and stylish template by Fresh Blogger Templates.


Demo | Download


Provincia

Provincia

A shiny Web 2.0 style theme by Blog and Web.


Demo | Download


Sweet Dreams

Sweet Dreams


This is quite an old theme now, but it's still one of my favorite designs.


Demo | Download


Firefox 2

Firefox 2

Firefox fans will love this clear and simple theme by Final Sense.


Demo | Download


Gourmet Menu

Gourmet Menu

A template for food lovers, by Blogger Buster.


Demo | Download


Fluid Width Three Column

Fluid Width Three Column Theme


Designed by Vin of Beta Blogger for Dummies, this theme will adjust fluidly to fit the browser size without breaking the template. Includes navigation links in the header section, and is optimized for search engines.


Demo | Download


Styleicious

Styleicious


This fresh and funky theme was converted from a Wordpress theme by Blog and Web.


Demo | Download


Yoghourt

Chocolate Candy Yoghourt


The original Yoghourt Wordpress theme has always been one of my favorites, so I was really pleased to see Jackbook had converted this for Blogger!


Demo | Download


My Valentine

My Valentine


One of my most recent themes, this was designed in honor of Valentines'd Day, though it is a feminine and pretty blog theme which could easily be used all year round.


Demo | Download


Compaq

Compaq


This unusual theme makes your posts appear as though on the screen of the computer! Designed by Final Sense.


Demo | Download


Pink Diva

Pink Diva


A simple and "oh-so-girly" theme from Fresh Blogger Templates


Demo | Download


Voodoo

Voodoo


A cute, yet arguably sinister theme by SuckMyLolly.


Demo | Download